Swap-bot Time: December 30, 2024 9:23 am
www.swap-bot.com

Water color spray ink collage postcard

Launch gallery slideshow
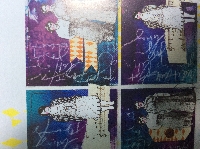
Water color spray ink collage postcard
Group:Mixed Media Mania
Swap Coordinator:Paulaeliza (contact)
Swap categories: Art  Postcards  Rubber Stamping 
Number of people in swap:2
Location:International
Type:Type 3: Package or craft
Last day to signup/drop:August 15, 2017
Date items must be sent by:August 31, 2017
Number of swap partners:1
Description:

While playing with art materials you will make one postcard and send it to your partner.

Material List

*Water color paper *Bristol paper or white cardstock *your art journal if you are using one *Spray inks (I would pick 3 you like to start) *Permanent ink pad *Distress ink pads (2) *Stamps (some you have or some you have been thinking of getting) *Stencil (again, some you have or some you have been thinking of getting) *Sheet music or page from a book *Manila tag *White Stabilo Marks All pencil *Dye-based markers (the ones you can use for stamping) *Paintbrush *Water *Paper towels *Adhesive *Paper cutter (or scissors if you don't have one) *Scissors *Sewing machine & black thread ( or needle for hand stitching if you don't have the machine *Nonstick craft sheet to cover work surface

*Cover your work surface with the nonstick craft sheet.

  1. Spray one-third of your paper with one color ink.
    Spray one-third of your paper with your next color ink.
    Spray one-third of your paper with your third color ink.
    Let it dry or dry it with a heat gun if you are impatient like me.

  2. Wet a paint brush and draw large circles on the inky paper. Use a lot of water. Lift up paper and let water run off the sheet. Blot the paper and your work surface with paper towel or use another piece of your paper to blot (that is what I do). Dry completely.

  3. Stamp background type stamps over parts of your paper using permanent ink.

  4. Cut paper into four 4 1/2 x 4 1/2 squares. ( Or cut 4 squares that fit on your paper with a little space between. Don't throw out let over paper. Use it in other art projects)

  5. Use your sewing machine to sew around the squares. Or hand sew or skip this step. That is up to you. Sewing adds another cool element to your project.

  6. Now take a new sheet of paper or do this step on your art journal page. You could also use the paper that you blotted up the water with if you didn't use paper towel. Spray some ink over your stencil onto your paper in random spots and on two or three of the corners. (To clean my stencil I flip it over on a new sheet of paper or on another journal page. If you prefer you can clean it with a paper towel.). Let paper dry or pull out your heat tool again.

  7. Glue the 4 squares onto the page.

  8. Stamp, ink, and or stencil your tag. Cut it up into pieces or use it as it ends up as an element for your page.

  9. Use your stamps to stamp some images on clean white Bristol or card stock and cut them out. They will be elements to add to your page.

  10. Tear a few strips of sheet music or book pages.

  11. Now use the strips, tag, and stamps to make a collage over your squares. Glue everything down in an arrangement that pleases you.

  12. Use the white pencil to add journaling elements to the squares and your collage. If you don't know what to write, write about how this experience made you feel.

  13. Use your markers to add to your stamped elements and/or your collage.

*You might want to use a sealant to seal your work.

Now make your postcard for your partner using these techniques.

Activity adapted from the book Art Journal Freedom by Dina Wakley

Discussion

Leave a Comment

You must be logged in to leave a comment. Click here to log in.

I received the item
I sent the item

Received from:
For multiple members, separate names with spaces

Description: