Swap-bot Time: April 18, 2024 5:52 pm
www.swap-bot.com

C+P ATC: Acrylic Skin Background

Launch gallery slideshow

C+P ATC: Acrylic Skin Background
Swap Coordinator:stephiedee (contact)
Swap categories: Artist Trading Card (ATC) 
Number of people in swap:7
Location:International
Type:Type 3: Package or craft
Last day to signup/drop:August 3, 2012
Date items must be sent by:August 20, 2012
Number of swap partners:1
Description:

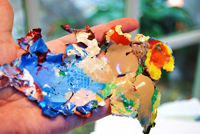
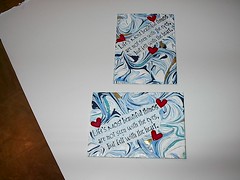
Acrylic paint skins are simply sheets of dried acrylic paint. To make them, just layer some acrylic paint on a non-stick surface - like a sheet of plastic. You can use things like toothpicks or combs to make marbled effects in the paint. Once the paint is thoroughly dried, peel it away from the non-stick surface.

Here are a few proper tutorials:

(You can find a bunch more online, too.)

For this swap, we will be making collage ATC's that have acrylic paint skin backgrounds. You can make and use as many pieces of paint skins on your background as you want. The requirement is for an acrylic skin background, so you will need to incorporate more elements in to the ATC. Theme is sender's choice. DO adhere the paint skin(s) to a sturdier surface and stick to standard ATC sizing requirements (2.5"x3.5").

Discussion

stephiedee 07/13/2012 #

Notes from experience: when I make these, it's usually just a by-product of me mixing paint for other projects on a plastic palette (a large plastic baggie). When I peel them off, the undersides are, more often than not, the more interesting sides.

I don't add any special mediums to the paint and use Mod Podge to attach the skins to other surfaces.

mizvicky 07/13/2012 #

What a challenge!!! I'm in

stephiedee 07/17/2012 #

It's fun - and kind of addicting - @mizvicky ! Hope you decide to join.

Just for a visual, here are a few backgrounds I've made so far:


(click pic to see it larger)

snowqueen1426 07/26/2012 #

Wow......... Just finished my ATC with Acrylic skin background.. I'm so glad a made two so I could keep one of these beauties... I do have some suggestions.... : ) Allow yourself plenty of time... I painted a 6" x 6" area on a Heavy plastic bag.. Actually I poured paint on there and stired it around. I did not add any extra Gel medium or binder.. (The area NEEDS to be thick) or when you peel it off the plastic it will break into a million pieces.. I let it dry on the plastic for two days... then gently peeled the acrylic and turned it over to dry the underside.. I left it another full day.. By then it felt like plastic. COOL! Then I cut the acrylic piece with my paper cutter.. easy/peasey..! Mounted it to my backing board with Tacky Glue.. Place a heavy dictionary on top and left it a few hours.. then checked the edges because they wanted to curl up.. For more elements: I used a stamped quote with some small pearl resist hearts that I made.. That way my acrylic background is predominant.. This was so MUCH fun... and honestly........Very Easy..

snowqueen1426 07/26/2012 #

Here's a pic..

alt text

stephiedee 07/26/2012 #

They look awesome, @snowqueen1426 - I love the swirly pattern you achieved.

lilspotteddog 08/14/2012 #

This was very fun to do! I used my Lumieire paints, so I hope my partner likes it. And, like @snowqueen1426 I made some extras for myself!

Leave a Comment

You must be logged in to leave a comment. Click here to log in.

I received the item
I sent the item

Received from:
For multiple members, separate names with spaces

Description: